Introduction
You have a logo that needs to become embroidery. Maybe it's for a client's uniform program, a family reunion, or your own small business. And your machine? It's a Husqvarna Viking or a Pfaff, which means it speaks VIP. That little three-letter extension is the key to turning your flat design into something you can actually stitch. But here's the thing about VIP files—they're not like JPGs or PNGs. You can't just rename a file and call it done. When you Convert Logo to VIP Embroidery File, you're building a detailed set of instructions that tells your machine exactly where to put every single stitch. Get it right, and your embroidery sings. Get it wrong, and you'll spend hours fighting thread breaks and puckering. Let me walk you through what you need to know.
First, What Is a VIP File?
VIP stands for Husqvarna Viking Embroidery Format, and it's been around since the late 1990s when Husqvarna merged with Pfaff . It's a native format for certain Viking and Pfaff machines, storing all the stitch data needed to recreate a design .
Here's the important part: VIP is considered a legacy format now . Newer machines have moved to VP3 and VP4, which offer better editing capabilities and more features. But if you own an older Viking or Pfaff, VIP is still what you need.
The file itself contains stitch-by-stitch instructions—where the needle goes, what type of stitch to use, how dense the stitching should be, and when to change colors . It's not a picture. It's a blueprint.
Why VIP Conversion Is Different from Other Formats
Converting to VIP comes with its own set of considerations.
Older technology. Because VIP is an older format, it doesn't support all the advanced editing features that newer formats do . Once you create a VIP file, making changes later can be tricky.
Machine-specific. VIP was designed specifically for Husqvarna Viking and Pfaff machines . That's great if you own one of those. Not so great if you're sharing files with friends who use different brands.
Limited software support. Not every embroidery program handles VIP files well. You need software that specifically supports this format.
Your Options for Creating VIP Files
You've got a few paths forward. Let me break them down honestly.
Option 1: Professional Digitizing Services (The Smart Choice)
This is what I'd recommend for almost anyone who needs reliable results. Companies like Digitizing Buddy and Absolute Digitizing specialize in creating VIP files for Husqvarna Viking and Pfaff machines .
Here's how it works:
You send your logo and specifications
Their experienced digitizers create a manual, hand-punched VIP file
They deliver the file ready for your machine
You test, they revise if needed (free revisions are standard)
Prices start around $10 for simple designs, with rush service available in 2-4 hours . For the cost of a few files, you skip the learning curve and get professional results immediately.
Option 2: Learn Digitizing Yourself
If you're the type who loves learning new skills and has time to invest, you can absolutely learn to digitize for VIP.
You'll need software that supports VIP export. Options include:
Wilcom Embroidery Studio E4 – Industry standard, powerful, expensive
Hatch Embroidery – Popular among hobbyists and small businesses
Pulse – Professional-grade, widely used
Ink/Stitch – Free, open-source, but has a learning curve
The software itself costs hundreds to thousands of dollars. And expect to spend months getting comfortable with the basics—stitch types, density, underlay, pull compensation, sequencing. It's a rewarding skill, but it's not a weekend project.
Option 3: Auto-Digitizing (Not Recommended)
Some software has auto-digitize buttons that promise to do the work for you. It's tempting, I know.
Here's the reality: auto-digitizing produces mediocre results at best . It works okay for very simple designs with big blocky shapes. But anything with small text, fine details, or multiple colors will turn into a mess. You'll spend more time fixing problems than actually stitching.
Option 4: Converting from Other Formats
If you already have a design in another format (like PES or DST), you can convert it to VIP using software like Brother's Design Database or mySewnet .
The process is straightforward:
Open your software
Select the file you want to convert
Choose VIP as the output format
Save the new file
This works, but be aware that conversion can sometimes lose details or change stitch interpretations . Always test the converted file before production.
What Information Your Digitizer Needs
Whether you do it yourself or hire it out, certain information is essential for good VIP files.
The image itself. Vector files (AI, EPS, PDF) are ideal because they scale perfectly and have sharp edges . If all you have is raster, make sure it's high resolution—300 DPI at minimum at your target size.
Exact finished size in inches. Left chest logos are typically 3-4 inches wide. Cap designs have specific limitations. Be precise.
Fabric type and garment style. This information drives underlay choices, density settings, and pull compensation. A file for a structured cap needs different engineering than one for a stretchy polo .
Thread color requirements. If you have specific color needs, include them. This saves time matching later.
Your machine model. Different machines within the Viking/Pfaff family might have slightly different capabilities. Knowing exactly what you're using helps the digitizer optimize the file.
The Digitizing Process Step by Step
Here's what actually happens when a professional digitizer converts your logo to VIP.
Step 1: Import and size. Your image gets loaded into software and set to the exact dimensions you need .
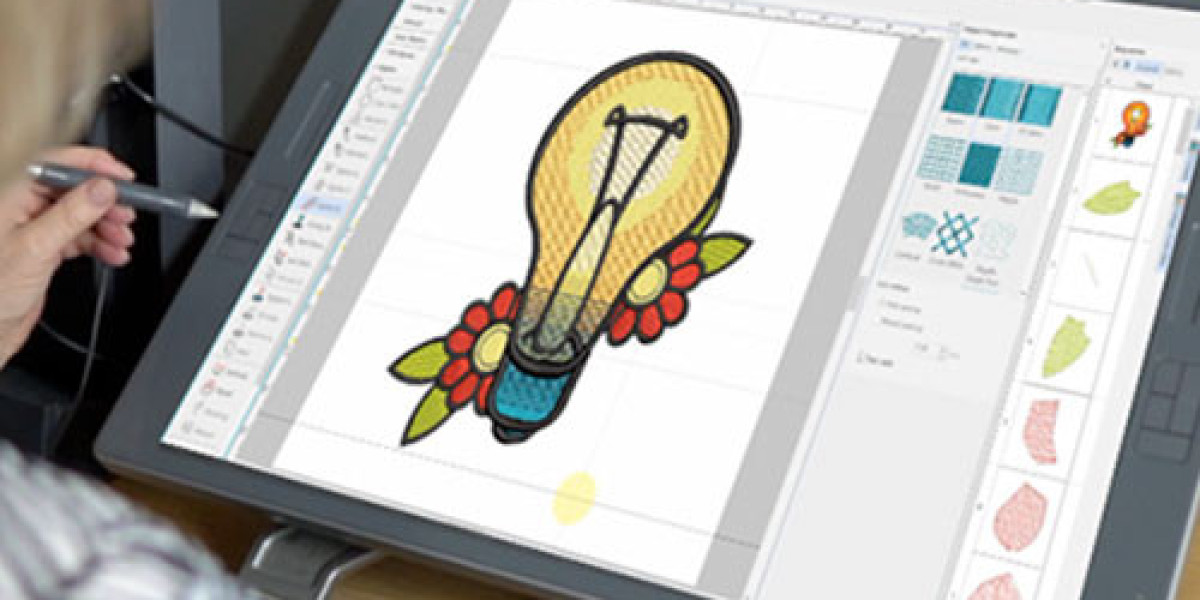
Step 2: Manual tracing. The digitizer traces each element of your logo by hand, creating paths that will become stitches. They decide which parts need satin stitches for smooth edges, which need fill stitches for coverage, and how everything should flow .
Step 3: Stitch assignment. Different elements get different stitch types. Borders get satin stitches. Large areas get fill stitches at appropriate densities. Small text gets special handling .
Step 4: Underlay addition. Foundation stitches are added to stabilize the fabric and prevent puckering. You won't see them, but you'll notice if they're missing .
Step 5: Pull compensation. The design is adjusted to account for thread tension pulling fabric inward. Without this, circles become ovals .
Step 6: Density settings. The digitizer sets how close stitches will be. Too dense and the design feels like cardboard. Too light and fabric shows through .
Step 7: Color assignment. Thread colors are matched to your logo with color change commands at the right points .
Step 8: Sequencing. The stitch order is arranged for efficient sewing, minimizing jumps and trims .
Step 9: Export. The finished file is saved as VIP and delivered to you .
Testing: The Step Nobody Should Skip
Here's where beginners make their biggest mistake. You get your VIP file, you're excited, and you want to stitch that final project right now.
Stop. Test first.
Load the file on scrap fabric that matches your final material. Same stabilizer. Same settings. Run it at your normal speed and look carefully .
Check for:
Puckering or distortion
Thread breaks during the run
Registration between colors
Clarity of small text and details
Overall appearance compared to the original logo
If anything's off, send photos to your digitizer. Good services include free revisions for exactly this reason . One test stitch costs pennies. A batch of ruined garments costs real money and real reputation.
Common Mistakes to Avoid
Let me save you some pain by pointing out the mistakes I see most often.
Starting with bad artwork. You can't make a good VIP file from a tiny, blurry logo grabbed off a website . Get the best source you can.
Using free online converters. Those "convert JPG to VIP in one click" tools are scams. They don't create real stitch data . At best, they waste your time. At worst, they steal your designs.
Relying on auto-digitize. Auto-digitizing makes generic guesses. It doesn't know your fabric or your machine. The results are almost always disappointing .
Skipping the test stitch. I know I said this already, but it's worth repeating. Test first. Always.
Ignoring fabric type. A file made for a cap won't work on a polo. Tell your digitizer what you're stitching on .
Working with Newer Machines
If you have a newer Husqvarna Viking or Pfaff machine, you might be better off using VP3 instead of VIP . VP3 is the modern replacement, offering better editing capabilities and more features.
You can still convert VIP files to VP3 using compatible software, but if you're starting from scratch, consider whether VP3 might be a better long-term choice for your equipment .
Building a Relationship with a Digitizer
Here's something experienced embroiderers know: once you find a digitizer who delivers good work consistently, stick with them.
Companies like Digitizing Buddy and Absolute Digitizing have clients who've been with them for years . Over time, they learn your preferences. They know you like slightly lower density on caps. They remember that you name files a certain way. They understand your machine's quirks. Every order gets faster and smoother because you don't have to explain everything from scratch.
Conclusion
When you Convert Logo to VIP Embroidery File, you're doing the most important work of your entire embroidery process. Every stitch your machine makes, every garment you deliver, every happy client—it all starts with that file.
VIP is a legacy format, but for those with older Husqvarna Viking and Pfaff machines, it's still essential. The key is doing it right—starting with quality artwork, using proper digitizing techniques, and testing before production.
For most people, partnering with professional digitizing services is the smartest path. Companies like Digitizing Buddy and Absolute Digitizing have the software, experience, and processes to deliver perfect VIP files without you having to become a digitizing expert overnight .
Your machine is capable of beautiful work. Give it beautiful files, and it will make you proud every time. Start with quality artwork, provide clear specifications, test before production, and build relationships with trusted partners. Do these things, and your VIP files will serve you well for years to come.